


Composer is a PHP dependencies manager. It helps you to automate library installation and solve incompatibility issues. Here, you will learn how to install Composer on your Windows, Mac, and Linux. Also, you can find some troubleshooting tips you may face with Composer.
What Is Composer and Why Should You Use It?
Composer is a PHP dependency manager that allows you to:
- Automatically download and install required libraries.
- Ensure compatibility among packages.
- Save time by automating the update process.
You can install it either in a project directory or globally for system-wide access. With Composer, you can easily define the libraries that your project depends on. It automatically determines the necessary versions of related packages, downloading and installing them for you.
Each project’s dependencies are specified in a composer.json file. It allows Composer to select compatible package versions with your project. It helps developers to focus on enhancing the core features by simplifying the development process.
Requirements for Installing Composer
Before starting with Composer, ensure your system has the basic requirements. Having these prerequisites makes the installation process smooth and error-free.
- PHP Installed: The latest Composer requires PHP 7.2.5 or higher. Run:
php -v
- Command Line Access: Use Terminal (macOS/Linux) or Command Prompt/PowerShell (Windows).
- Internet Connection: For downloading dependencies.
Install Composer on Windows, macOS, and Linux
Depending on your platform, you have different options for installing Composer. The following sections give you instructions to install Composer on Windows, macOS, and Linux.
Installation on Windows
Installing Composer on Windows is a simple process. Unlike other platforms that may require manual setup steps, Windows provides a convenient installation file that automates most of the process. To get started, follow the below steps:
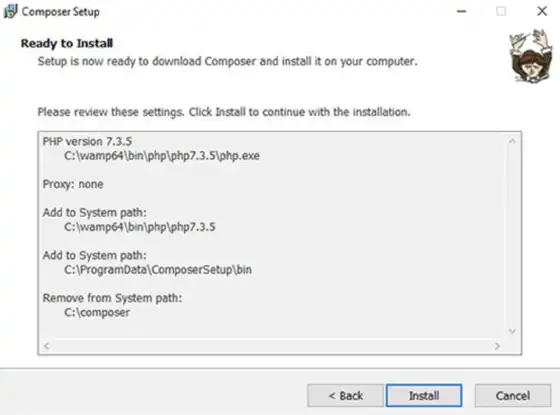
- Download Composer-Setup.exe:
Go to Composer’s download page and get the installer. - Run the Installer:
Follow the instructions. If PHP isn’t detected automatically, manually locate the PHP executable. - Verify Installation:
Open Command Prompt and run:composer
If successful, you’ll see Composer’s CLI interface. Otherwise, you can use this to troubleshoot.
Installation on macOS
To install Composer on mac need to download the installer. So do like this:
- Download Composer Installer:
Open Terminal and run:php -r "copy('https://getcomposer.org/installer', 'composer-setup.php');" - Run Installer:
php composer-setup.php
Then you should see the “composer.phar” file appears near composer-setup.php
- Remove the Installer:
php -r "unlink('composer-setup.php');" - Move Composer to Global Path:
sudo mv composer.phar /usr/local/bin/composer
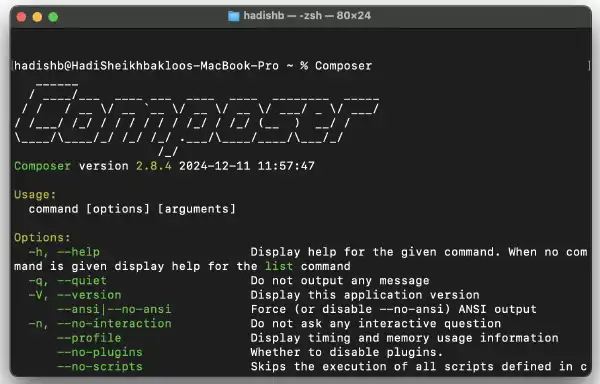
- Verify Installation:
composer
If successful, you’ll see Composer’s CLI interface.
Installation on Linux
We need to download the composer installer on Linux, like Mac. Open Terminal and follow the steps below:
- Prepare System:
Linux often requires additional system updates or dependencies like php-cli, unzip, or curl (e.g., apt for Ubuntu, yum for CentOS):sudo apt update sudo apt install php-cli unzip curl
- Download Composer Installer:
curl -sS https://getcomposer.org/installer -o composer-setup.php
- Install Composer Locally:
php composer-setup.php
Then you should see the “composer.phar” file appears near composer-setup.php
- Move Composer to Global Path:
sudo mv composer.phar /usr/local/bin/composer - Ensure it’s executable:
sudo chmod +x /usr/local/bin/composer
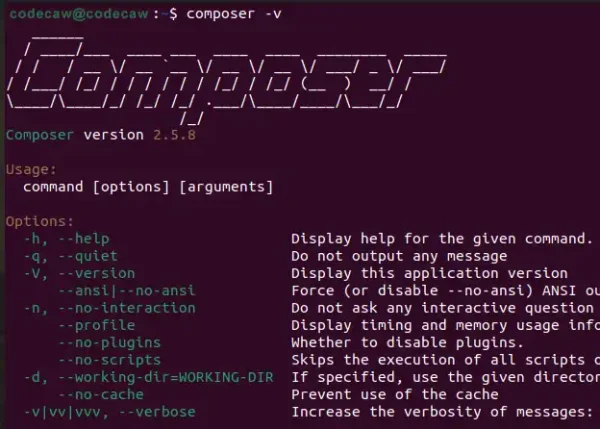
- Verify Installation:
composerIf successful, you’ll see Composer’s CLI interface.
After installation: Using Composer
Once Composer has been installed, you are ready to use it. The following steps will initialize a new project, manage dependencies, and keep your libraries updated.
Create a New Project
This generates a composer.json file to manage your project.
composer init
Install Dependencies
Example: Install PHPUnit:
composer require phpunit/phpunit
If you would like to learn about PHPUnit, we have a full guide for it, You can check it: PHP Unit Testing
Update Dependencies
Keep libraries updated with:
composer update
Common Errors and How to Fix Them
Here are the common errors with installing Composer that you may face with them.
- Composer Command Not Recognized or Not Found:
Here are the solutions:- Linux and macOS:
Move the downloaded “composer.phar” file to a directory in the system’s PATH (e.g., /usr/local/bin):sudo mv composer.phar /usr/local/bin/composer
Ensure Permissions (Linux): Set executable permissions for the Composer binary:
sudo chmod +x /usr/local/bin/composer
- Windows:
This issue occurs because Composer isn’t added to the system’s PATH during installation. Follow the below steps:Step 1: Locate “composer.phar” or the installed Composer executable (e.g., composer.exe). If installed globally, it’s usually in C:\ProgramData\ComposerSetup\bin.
Step 2: Press Win + S and search for Environment Variables.
Step 3: Click Edit the system environment variables.
Step 4: Under System variables, find and select Path, then click Edit.
Step 5: Add the directory containing composer.exe or composer.bat (e.g., C:\ProgramData\ComposerSetup\bin).
- Linux and macOS:
- PHP Version Not Supported:
The latest Composer requires PHP 7.2.5 or higher. If your version is outdated, upgrade it.
To check your current PHP version use:php -v
- OpenSSL Missing:
Composer relies on OpenSSL for secure communications. Install the OpenSSL extension for PHP, For example, on Linux:sudo apt-get install php-openssl
- Outdated Composer Version:
Using an old version of Composer can cause compatibility issues. Update Composer to the latest version:composer self-update
- Memory Limit Exhausted:
You might see an error like PHP Fatal error: Allowed memory size of X bytes exhausted. The system’s PHP memory limit is too low, increase the memory limit temporarily:php -d memory_limit=-1 composer
For a permanent fix, update the memory_limit value in your php.ini file:
memory_limit = -1
- Composer.lock File Conflicts:
You might face issues when the composer.lock file is out of sync with composer.json.It happens when Changes in composer.json are made without updating the lock file. So regenerate the lock file:composer update
Advanced Tips for Composer
Here are the advanced tips that are better to know if you want to use Composer in your projects.
- Global vs. Local Installation:
Understanding the difference between global and local installations:Global: Composer is accessible system-wide. Ideal for installing tools you use across multiple projects (e.g., Laravel installer or PHPUnit).
Example: To install Laravel globally, run:composer global require laravel/installer
Local: Composer is installed in a specific project directory. It Keeps project dependencies isolated and avoids conflicts.
Example: Use the composer.phar file in the project folder:
php composer.phar install
- Run composer install: When cloning a repository or sharing a project, you often face composer.json and composer.lock files. To install all dependencies specified in these files run:
composer install
- Optimize Autoloader: For large projects, Composer’s autoloader can sometimes slow things down. Use the dump-autoload command to optimize performance:
composer dump-autoload --optimize
- Refresh Composer Autoloader: To regenerate the autoloader after adding new files or classes, run:
composer dump-autoload
Conclusion
We learned Composer is a powerful PHP dependency manager that enhances project development by automating library installation and resolving compatibility issues. Also helped you to install Composer on Windows, macOS, and Linux. It also included advanced tips and troubleshooting solutions for common problems you may face with composer.
FAQ
No, Composer requires PHP as it directly interacts with PHP dependencies
Remove the composer.phar file or delete the global installation path
Yes, Composer can be installed both globally and locally. A global installation makes Composer available system-wide, while a local installation keeps it specific to a single project directory.
To check the version of Composer installed, run the following command in your terminal or command prompt:
composer --version
To update Composer globally, use the command:
composer self-update
Yes, you can specify a specific version in the composer. For example:
composer require vendor/package:^2.0
This will install version 2.0 or the latest compatible version.